¶ What you'll be able to do
After reading this guide you will be able to record a visual baseline of a patient's mouth in VeriPath Dental using the standard two-digit FDI tooth system. You will learn how the FDI numbers work (adult teeth 11–48, primary teeth 51–85), how to add a chart entry for a single tooth, how to record its status (existing, proposed, or completed treatment), and how to note treatment on individual tooth surfaces. You will also understand what the Clinical Charting list shows and how to review a saved chart.
Who does this? Dentists (clinical staff) record charting. Practice managers and dental admins can also view chart entries. Receptionists do not normally chart teeth.
¶ Before you start
You will need:
- A VeriPath Dental login with the Dentist (or other clinical) role
- The patient's record — search for them by name or NHS number
- The FDI tooth number(s) for the teeth you are charting (adult 11–48, primary 51–85)
¶ About FDI notation
FDI (Fédération Dentaire Internationale) is the standard two-digit way of naming teeth. Every tooth has a two-digit number:
- First digit — which quadrant (corner of the mouth) the tooth is in.
- Second digit — the tooth's position, counting from the middle of the mouth.
| Quadrant | Location | Tooth numbers |
|---|---|---|
| 1 | Upper right (patient's right) | 11–18 |
| 2 | Upper left (patient's left) | 21–28 |
| 3 | Lower left (patient's left) | 31–38 |
| 4 | Lower right (patient's right) | 41–48 |
| 5–8 | Primary (baby) teeth, same layout | 51–85 |
So 26 is the first molar in the upper-left quadrant, and 47 is the second molar in the lower-right quadrant. Primary (baby) teeth use quadrants 5–8: for example, 64 is the first primary molar in the upper-right quadrant.
The Tooth Number box accepts any number from 11 to 85 — type the two-digit FDI number of the tooth you are charting (permanent teeth use 11–48, primary teeth 51–85).
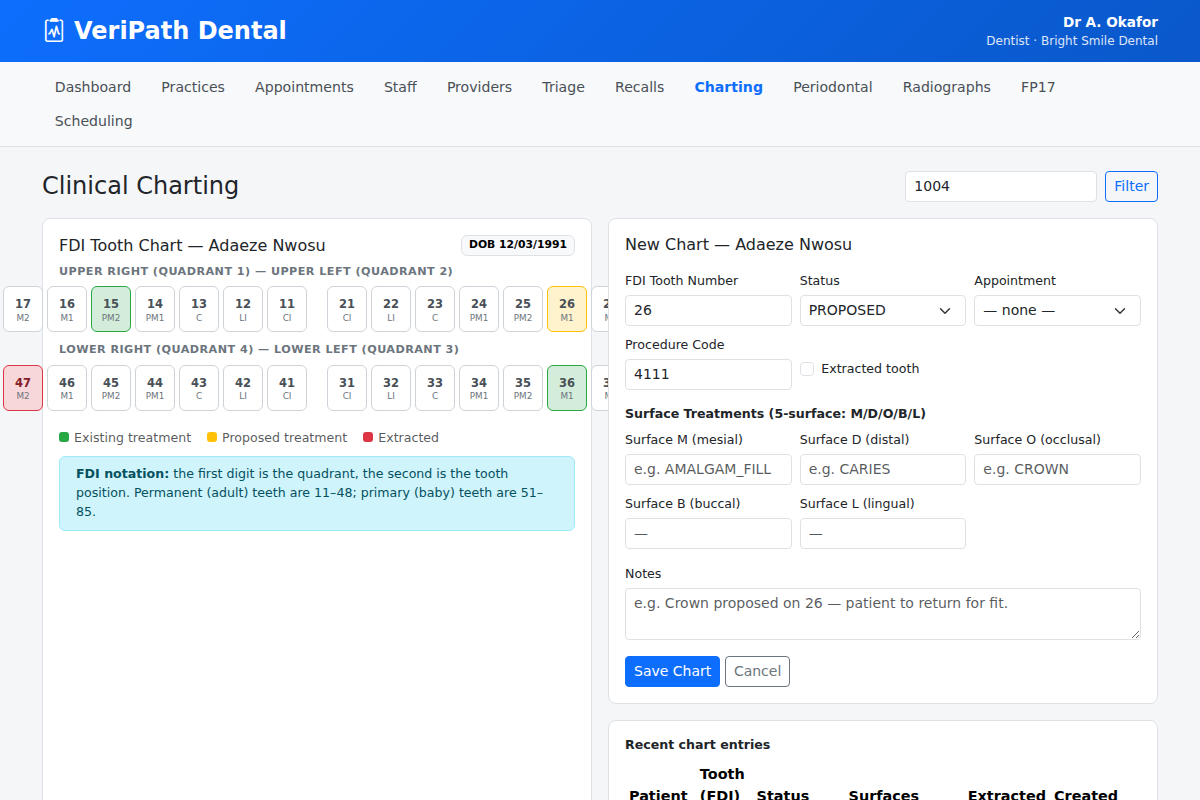
¶ Step 1: Open the Clinical Charting screen
- Log in to VeriPath Dental.
- Click Charting in the top navigation bar.
The Clinical Charting screen opens. It lists chart entries — one row per tooth — with the patient, tooth number, status, surfaces, whether the tooth is extracted, and the appointment the entry was recorded at.
| Column | What it shows |
|---|---|
| Patient | The patient the entry belongs to |
| Tooth (FDI) | The two-digit FDI tooth number |
| Status | Existing treatment, Proposed treatment, or Completed |
| Surfaces | Which tooth surfaces have treatment recorded (e.g. O: CROWN) |
| Extracted | Yes if the tooth has been removed |
| Appointment | The appointment the entry was recorded at — linked to that visit |
Tip: to find a patient's entries, type their patient ID in the Patient ID box and click Filter. Entries are shown 50 per page.
¶ Step 2: Start a new chart entry
- Filter the chart list to the patient (see the tip above). An Add chart button then appears at the top right.
- Click Add chart.
Tip: you can also start from an appointment — its Add Chart button opens the form with that appointment already selected.
The New Chart — patient name form opens. It is a single form for one tooth — you add one entry per tooth.
¶ Step 3: Enter the tooth and status
- FDI Tooth Number — type the tooth's two-digit number (e.g. 26). The box accepts 11–85.
- Status — choose one:
- EXISTING — treatment that is already in the mouth (e.g. an old filling).
- PROPOSED — treatment that is planned but not yet done (e.g. a crown to be fitted).
- COMPLETED — treatment that has been finished.
- Appointment (required) — choose the appointment this chart was recorded at from the patient's appointments. If you started from an appointment page, the correct one is already selected. Every chart entry must be traceable to a visit.
- Procedure Code (optional) — a treatment code, e.g. 4111, if your practice uses them.
Tip: use PROPOSED when you are planning work, so the patient's plan is visible on the chart. When the work is carried out at a later visit, record it as a COMPLETED entry on that visit — an entry's status is set when it is recorded.
¶ Step 4: Record surface treatments (optional)
Teeth have five surfaces, and you can note a treatment against each one:
| Surface | Where it is |
|---|---|
| M | Mesial — the side towards the middle of the mouth |
| D | Distal — the side away from the middle |
| O | Occlusal — the biting surface |
| B | Buccal — the cheek side |
| L | Lingual — the tongue side |
Type a treatment against any surface, for example AMALGAM_FILL or CROWN. Leave a surface blank if it has no treatment.
¶ Step 5: Notes and extracted teeth
- Extracted tooth — tick this box if the tooth has been removed. This is how you record a missing tooth on the chart.
- Notes — add any clinical notes you want to keep with the entry (for example, "Crown proposed on 26 — patient to return for fit").
¶ Step 6: Save the chart
- Click Save Chart.
The chart entry is saved and you are taken to the chart detail view, which summarises the entry: status, extracted flag, procedure code, linked appointment, when it was recorded, and the surface treatments table. Any notes are shown in an information box. From here you can add another chart for the same patient, or open all of the patient's charts.
What happens next: the new entry appears in the Clinical Charting list. You can add further entries for other teeth the same way, building up the patient's full baseline chart.
¶ Useful tips
- Baseline first — record existing treatment (fillings, crowns, extractions) at the patient's first visit so later changes are easy to spot.
- One entry per tooth — each form saves one tooth; add a new entry for each tooth you chart.
- Use the surfaces — a filling rarely covers the whole tooth, so record which surfaces it is on.
- Never invent chart data — only record what you can see or what the patient tells you, and always log out when you leave the workstation.